Artwork Guidelines
The following informaton will help you to prepare your files for print. If you have a specific problem that is not covered in this guide, or have other questions, please feel free to contact us. Improperly prepared files can cause delays in manufacturing.
The recommed print ready pdf files.
Quick Checklist
All fonts are included.
» Type is legible and crisp.
» Page layout is correct.
» Margins are set to the standards.
» Artwork matches the specified dimensions.
» All linked files, images, and fonts are embeded or placed in separate folders.
» Colors in CMYK mode..
Bleeds
Bleed must extend past the cut-line and will be trimmed from the product during the final cutting phase. When the image is required to extend all the way to the edge, bleed is needed to preserve the finished look and the quality of the final product.
Please keep all text at least 0.125" inside the cut-line.
- The bleed for Standard Products is 0.125".
- The bleed for Booklets and Presentation Folders is 0.25".
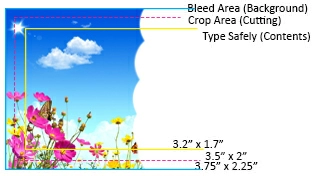
Type Safety: The safety line is an additional 1/8″ inside the trim line. All of your artwork and text should be inside this box to ensure that it is not cut-off when the page is cut. Visit out template section by clicking here to ensure your files are setup correctly. | |
Correct: Image extends to bleed box and type is within type safety area | |
| |
Incorrect: Image does not extend to bleed box and type is too close to the cutting line. | |
| |
Border : If the border is too close to the cut line, it may be cut off-center slightly.
| |


Color Specifications
Print previews are not a safe and sure measuring tool for color accuracy. Colors on the file might be effected by monitor calibration, screen resolution and lighting, just to name a few. Many Pantone colors show a marked color shift when converted to four color process.
If you send us an RGB file, there is a chance that a color shift may occur and you may not be satisfied with your job.
These colors are in RGB

These are the same colors but in CMYK

You should always start and finish your designs in CMYK color mode.
Image Resolutions
» All images and pictures should have minimum of 300 dpi in actual size for regular format. (Flyers, Brochures, Postcards, Business cards, door hanges and etc.)
» All images and pictures should have 150 dpi in actual size for large format. (Posters, Banners, displayes, signs and etc.)
» Rasterized text or logos should be 1200 dpi.
» Screen values should be between 133 lpi and 150 lpi.
Low resolution files may be printed as is or will be placed on hold until we receive new files, slowing your turn-around.
These are 72 dpi low res images Low Res
These are the same images but at 300 dpi High Res

We only accept 300 dpi files and no less.
Guidelines by Application
Adobe Photoshop
Adobe Illustrator/ Indesign
What is overprint and how do i check for it ?
overprint is the process of 1 colour printing on top of another. see picture for detail. When you have a dieline on a job the lines of the diestrike must be set to overprint. this is to make sure the image under the dieline prints without leaving a white line
| |
A classic mistake is when a white foreground element is layed on top of a black background element and overprint fill is applied to the white foreground element. It will look just fine in the pdf file (unless you have the overprint preview selected) but when it is separated in your printer's rip, the white will disappear. The simple thing to remember is to never apply overprint fill to a foreground element that is lighter than the background. There may be some exception to this rule, but this is a general rule of thumb. | |
| |


To check this in illustrator - top menu - Window - Attributes
check InDesign top menu - Window - Ouput - Attributes
In Acrobat Top menu Print Production - Output preview then click on simulate overprint
Digital Proofs
We provide PDF files as electronic soft proofs. These digital proofs intend to show you the layout and design elements of your job, but cannot be a guarantee of color accuracy. If color accuracy is of extreme importance to you, please ask for a hard copy proof. Scan all transparencies and line art at 100% of final size unless data size is prohibitive. If such a case occurs, scan at 1/4 or 1/2 of final size. Scan all transparencies and line art at 100% of final size unless data size is prohibitive. If such a case occurs, scan at 1/4 or 1/2 of final size.